Page Title
This is a Paragraph. Click on "Edit Text" or double click on the text box to start editing the content and make sure to add any relevant details or information that you want to share with your visitors.
Before you start hunting:
Fossil hunting can be a thrilling adventure, but it's essential to prepare properly before heading out. Whether you're a beginner or a seasoned pro, having the right tools and knowledge will make your trip more enjoyable and successful. Planning is critical, and it starts with research. Know what you're looking for and study the sediments before you dig. You can find valuable information through local rock clubs, online research, or pay-to-dig sites.
Before you start digging, make sure to dress appropriately for the weather conditions. Fossil hunting can vary from a tranquil stroll on a beach in shorts and t-shirt during the summer, to extreme physical challenges in the depths of winter. Whether you're braving the heat or facing the cold, wear layers that allow you to adjust to changing conditions. Don't forget to pack warm clothing, waterproof gear, and sturdy footwear to keep you comfortable and safe.
In addition to dressing correctly, consider building a basic tool kit. This will help you navigate the terrain and collect your finds safely. A good tool kit should include essentials like a rock hammer, brush, and gloves. And don't forget to pack it in and pack it out - leave the site better than you found it, and take your trash with you. Additionally, try to minimize the hole damage made while digging, as this will make it easier for future visitors to access the site.
Before you start digging, also make sure to follow proper etiquette and state regulations. If a site is closed or marked with No Trespassing signs, don't try to access it without permission. Remember, respect for the land and its owners is key. If permission is denied, don't get discouraged - thank the property owner and move on.
If you're on private property, consider showing your appreciation for the landowner by giving them something you've found. It might be a small token, but it can go a long way in fostering goodwill and paving the way for future accessibility. You might be surprised at the friendships that can result from a few moments of your time.


Being safe:
When embarking on a fossil hunt, safety should be your top priority. Ensure you have essential safety equipment, including a safety vest, steel-toed boots, gloves, and safety glasses. It's also crucial to have plenty of water and snacks on hand, as well as a first aid kit and any necessary medications. Before starting, check with your physician to ensure you're physically capable of handling the demands of digging.
In addition to general safety gear, there are several specialized items to consider. A well-fitted, quality hard hat is a must-have, especially in areas prone to falling rocks or debris. A high visibility jacket or brightly colored clothing is also recommended to increase visibility in case of an accident. In quarries, the use of high visibility jackets is a legal requirement.
When selecting a bag for your fossil hunting expedition, choose one that is specifically designed for this purpose. A sturdy bag with features such as brightly colored material, strong straps, back support, and multiple pockets will help keep you organized and protected. Look for bags with optional rain covers to keep your gear dry.
Finally, don't forget about footwear. A good pair of walking boots will protect your ankles from sprains, provide traction on slippery surfaces, and keep your feet dry in wet conditions. With various terrains likely to be encountered during your fossil hunt, it's essential to have boots that can handle a range of conditions.
Digging:
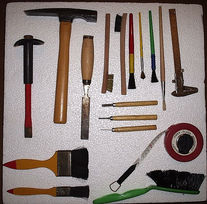
When digging for fossils, it's essential to bring the right tools. For common items, consider rock hammers, hand sledgehammers, and chisels. Pick end hammers are often the best choice, and chisel end hammers can be helpful as well. Chisels with a handguard can also be advantageous. These tools can be obtained from hardware stores.
When digging in softer sediments, a simple paintbrush can be a great starting point, with a two-inch brush being a good size. In clay deposit environments, dental picks, ice picks, and even old screwdrivers can be useful. To protect yourself from the elements and the sun, a tent or canopy can be a valuable addition to your equipment.
When choosing a hammer, it's essential to select one that feels comfortable and suits your individual needs. A hammer with a wide head and well-constructed handle is important. Before purchasing a hammer, try several different weights to find one that feels comfortable. For individuals with less physical strength and children, we recommend a head weight no more than 500g to avoid repetitive strain injury.
A chisel is also necessary for removing fossils from the surrounding matrix or splitting potential fossil-bearing nodules. A large chisel is usually sufficient for completing the bulk of the work, while a smaller, more precise chisel is needed for finer work. We recommend a chisel made from cold steel, as this metal is especially engineered for hard materials.
In addition to these tools, safety glasses are crucial when hammering rocks to prevent injury from rock splinters. Safety glasses ensure that any splinters are deflected away from the eyes. Eye protection should also be worn by spectators, as splinters can travel several meters from their origin.
To protect your hands during the extraction process, consider using a hammering glove or fingerless gloves with a leather underside for grip and comfort. These gloves can help prevent blisters and make the process of recovering fossils easier.


Delicate digging:
In some instances, it's not necessary to use a hammer and chisel to remove the matrix surrounding the fossil. Sometimes, all that's required is some careful precision work using a steel point. This is particularly relevant with crumbly matrix, where chiseling may otherwise shatter a fragile fossil. The steel point can also be used in conjunction with a liquid or gel glue (see below) as a last resort in the field to position and consolidate loose parts of the fossil.
A brush is an essential part of a fossil collector's toolkit, both in the field and at home. In instances where a fossil is partially covered by loose material and dust, the brush can be used to clean the surface in order to assess the most suitable method of recovery. It's also useful when making repairs in the field to clean the adjoining surfaces before gluing. We recommend a soft, fine-bristled brush.
Applying glue to specimens during the fossil trip should only be undertaken as a last resort, as these actions are almost certainly irreversible. For most of the time, it's best to undertake repairs in a controlled place, such as at home or under laboratory conditions. If the specimen is broken and can be safely transported without incurring further damage, a glue should not be used. However, in instances where the specimen would otherwise sustain irreversible damage in transit, a fast-setting glue provides a practical and valuable tool.
Examples of using superglues onsite include solidifying a chalk paste to ensure the safe extraction of a fossil, and securing fish scales on complete specimens recovered from shales. Fast-setting superglues are available in liquid and gel form. Liquid glues quickly penetrate cracks and the underside of loose surface material, while gels can be applied in a localised and controlled way. Please note that superglues can be potentially dangerous if handled without due care and attention. Always follow the guidelines supplied with the glue and wear safety glasses as an added safety measure.
Transporting fossils:
When transporting and storing fossils, it's essential to use protective materials to prevent damage. One effective method is to use foam sheets, which are commonly found in fruit boxes to prevent bruising. Foam sheets are lightweight, easy to carry, and can be used multiple times, unlike newspaper. When wrapping fossils with foam sheets, elastic bands can be used to prevent unwrapping during transport. They also provide an added benefit in that they can be used in all weather conditions.
For small, fragile specimens, it's recommended to carry a small compartment box containing cotton wool. The addition of cotton wool ensures the specimens are held in place during transportation, but extra care should be taken when removing strands of cotton wool that may become tangled around the specimen. Small plastic bags can be used to isolate specimens from each other and reduce the risk of damage, especially for fragile specimens.
For more serious collectors, it's recommended to bring additional items such as paper towels, tin foil, and plastic wrap to protect delicate fossil finds. In the case of fossils in damp or wet rock, wrapping in plastic wrap will keep them moist until they can be returned home and properly protected. Wrapping in tin foil will also further protect them from damage. Small film containers or plastic tubs can also be used to protect smaller fossils. By using these materials, you can ensure that your fossil finds are safely transported and stored.


Other useful equipment:
A hand lens is an essential tool for any fossil enthusiast, allowing you to marvel at the intricate details of your finds. It's astonishing to discover how well-preserved these tiny structures can be, revealing secrets that would otherwise remain hidden. We recommend a high-quality lens with x10 magnification, conveniently designed to fold into a durable metal casing that protects it from damage.
When photographing fossils in situ or in the comfort of your own home, it's crucial to include a scale to provide context and perspective. For formal purposes, a traditional black and white, laminated cm scale is ideal. However, for informal purposes, any everyday object can serve as a makeshift scale, such as your hand, a hammer, chisel, or mobile phone. This simple yet effective approach will enable experts to accurately identify your finds when sharing images electronically.